Main Quest [Guides]

The following takes place just as you arrive near the portal of Cassar Island after the opening cut scene:
Main Quest:
"After you have regained consciousness, you find yourself in front of a warp portal, which seems to be inactive. Thanks to a sign post for a first orientation, Cassar Village lies to the West. You should talk to all the people here, especially Merridon. You'll find him in Cassar village, next to the item shop."Before you head west, talk to the NPC Okimocery, who is standing near the portal. Speaking to him allows you to choose your character's name. Note: for the purpose of this walkthrough, all character names will be the default ones. Speak to him again, and he tells you the portal has been sealed for years and is frightened by your sudden appearance.
He also notes that monsters also came through the portal.
Now head West to Cassar Village and speak to Merridon.
Main Quest:
"The people here don't trust you. They think you're an invader, acting in bad faith. To gain some trust, you should help out the people. Merridon told you about Sarrothrod. He has left the village and never returned. Why? Some investigations could help. Leave the village to the north and kill all monsters blocking the way. There must be a passage to Ed Orable in the East of Cassar Island."Head out the north part of Cassar Village and you'll run into NPC Rinnevor. He tells you to go back to Merridon to get a Ladder which will help you cross the hole next to him. Do that now.
You also have the option of doing the following side quests:
- Regaining Trust (speak to Thierney in Cassar Village)
- Alchemy Experiments (speak to Eccmold behind the fence where Stella is in Cassar Village)
- A Proof of Strength (speak to Ryshenn, who is beside Merridon in Cassar Village)
Main Quest:
"With the ladder, you're now able to pass the pit. Clear your way to Ed Orable who lives at the east side on Cassar Island by battling all monsters that are blocking your way. You can avoid some battles by evading the monsters."Now use the ladder on the hole and continue on. Grab the Shield Bash scroll out of the nearby chest and make your way southeast. Speak to Ed Orable when you find him.
Main Quest:
"Sarrothrod never arrived at Ed Orable's hut. Probably he was looking for cover in the Southport Mines during the big storm. Ed gave you a saw, so you are now able to pass the big mammoth tree , which blocks the way. Head straight to south-west. When you see the mammoth tree, you're on the right way. Sarrothrod is probably somewhere in the mines. Hopefully, he's not in danger?"Head southwest and use the Brashly Mammoth Saw on the Mammoth Tree then head towards the entrance of the Southport Mines. At the entrance, NPC Ateephi will offer to supply you with free Simple Torches. Enter the mines.
The room just to the left of where you enter is not available until a later date. Continue on your way to find Sarrothrod. Speak to him when you find him.
Main Quest:
"Sarrothrod was very happy that you came to his rescue. Obviously he doesn't have any information about the portal system or a way back to your home dimension, but he tells you to talk to Ed Orable again. He might know some people that can help."After speaking with him, continue southwest until you reach two levers. One will open the way to the exit, and one will open the previously blocked area in the north section of the mines. Note that Sarrothrod also gives you the key Item Legendary Cutter Axe, which Merridon was looking for.
Feel free at this time to search the entire mines area for items. Among the "normal" items you find, you will also find these notable items:
- Misc Expander (southwest section)
- White Crystal (southwest section)
- Toy Sword + (in a nook to the south just as you pass the first left hallway from the entrance)
- Earth Crusher scroll (central)
- Recovery Expander (top northeast area)
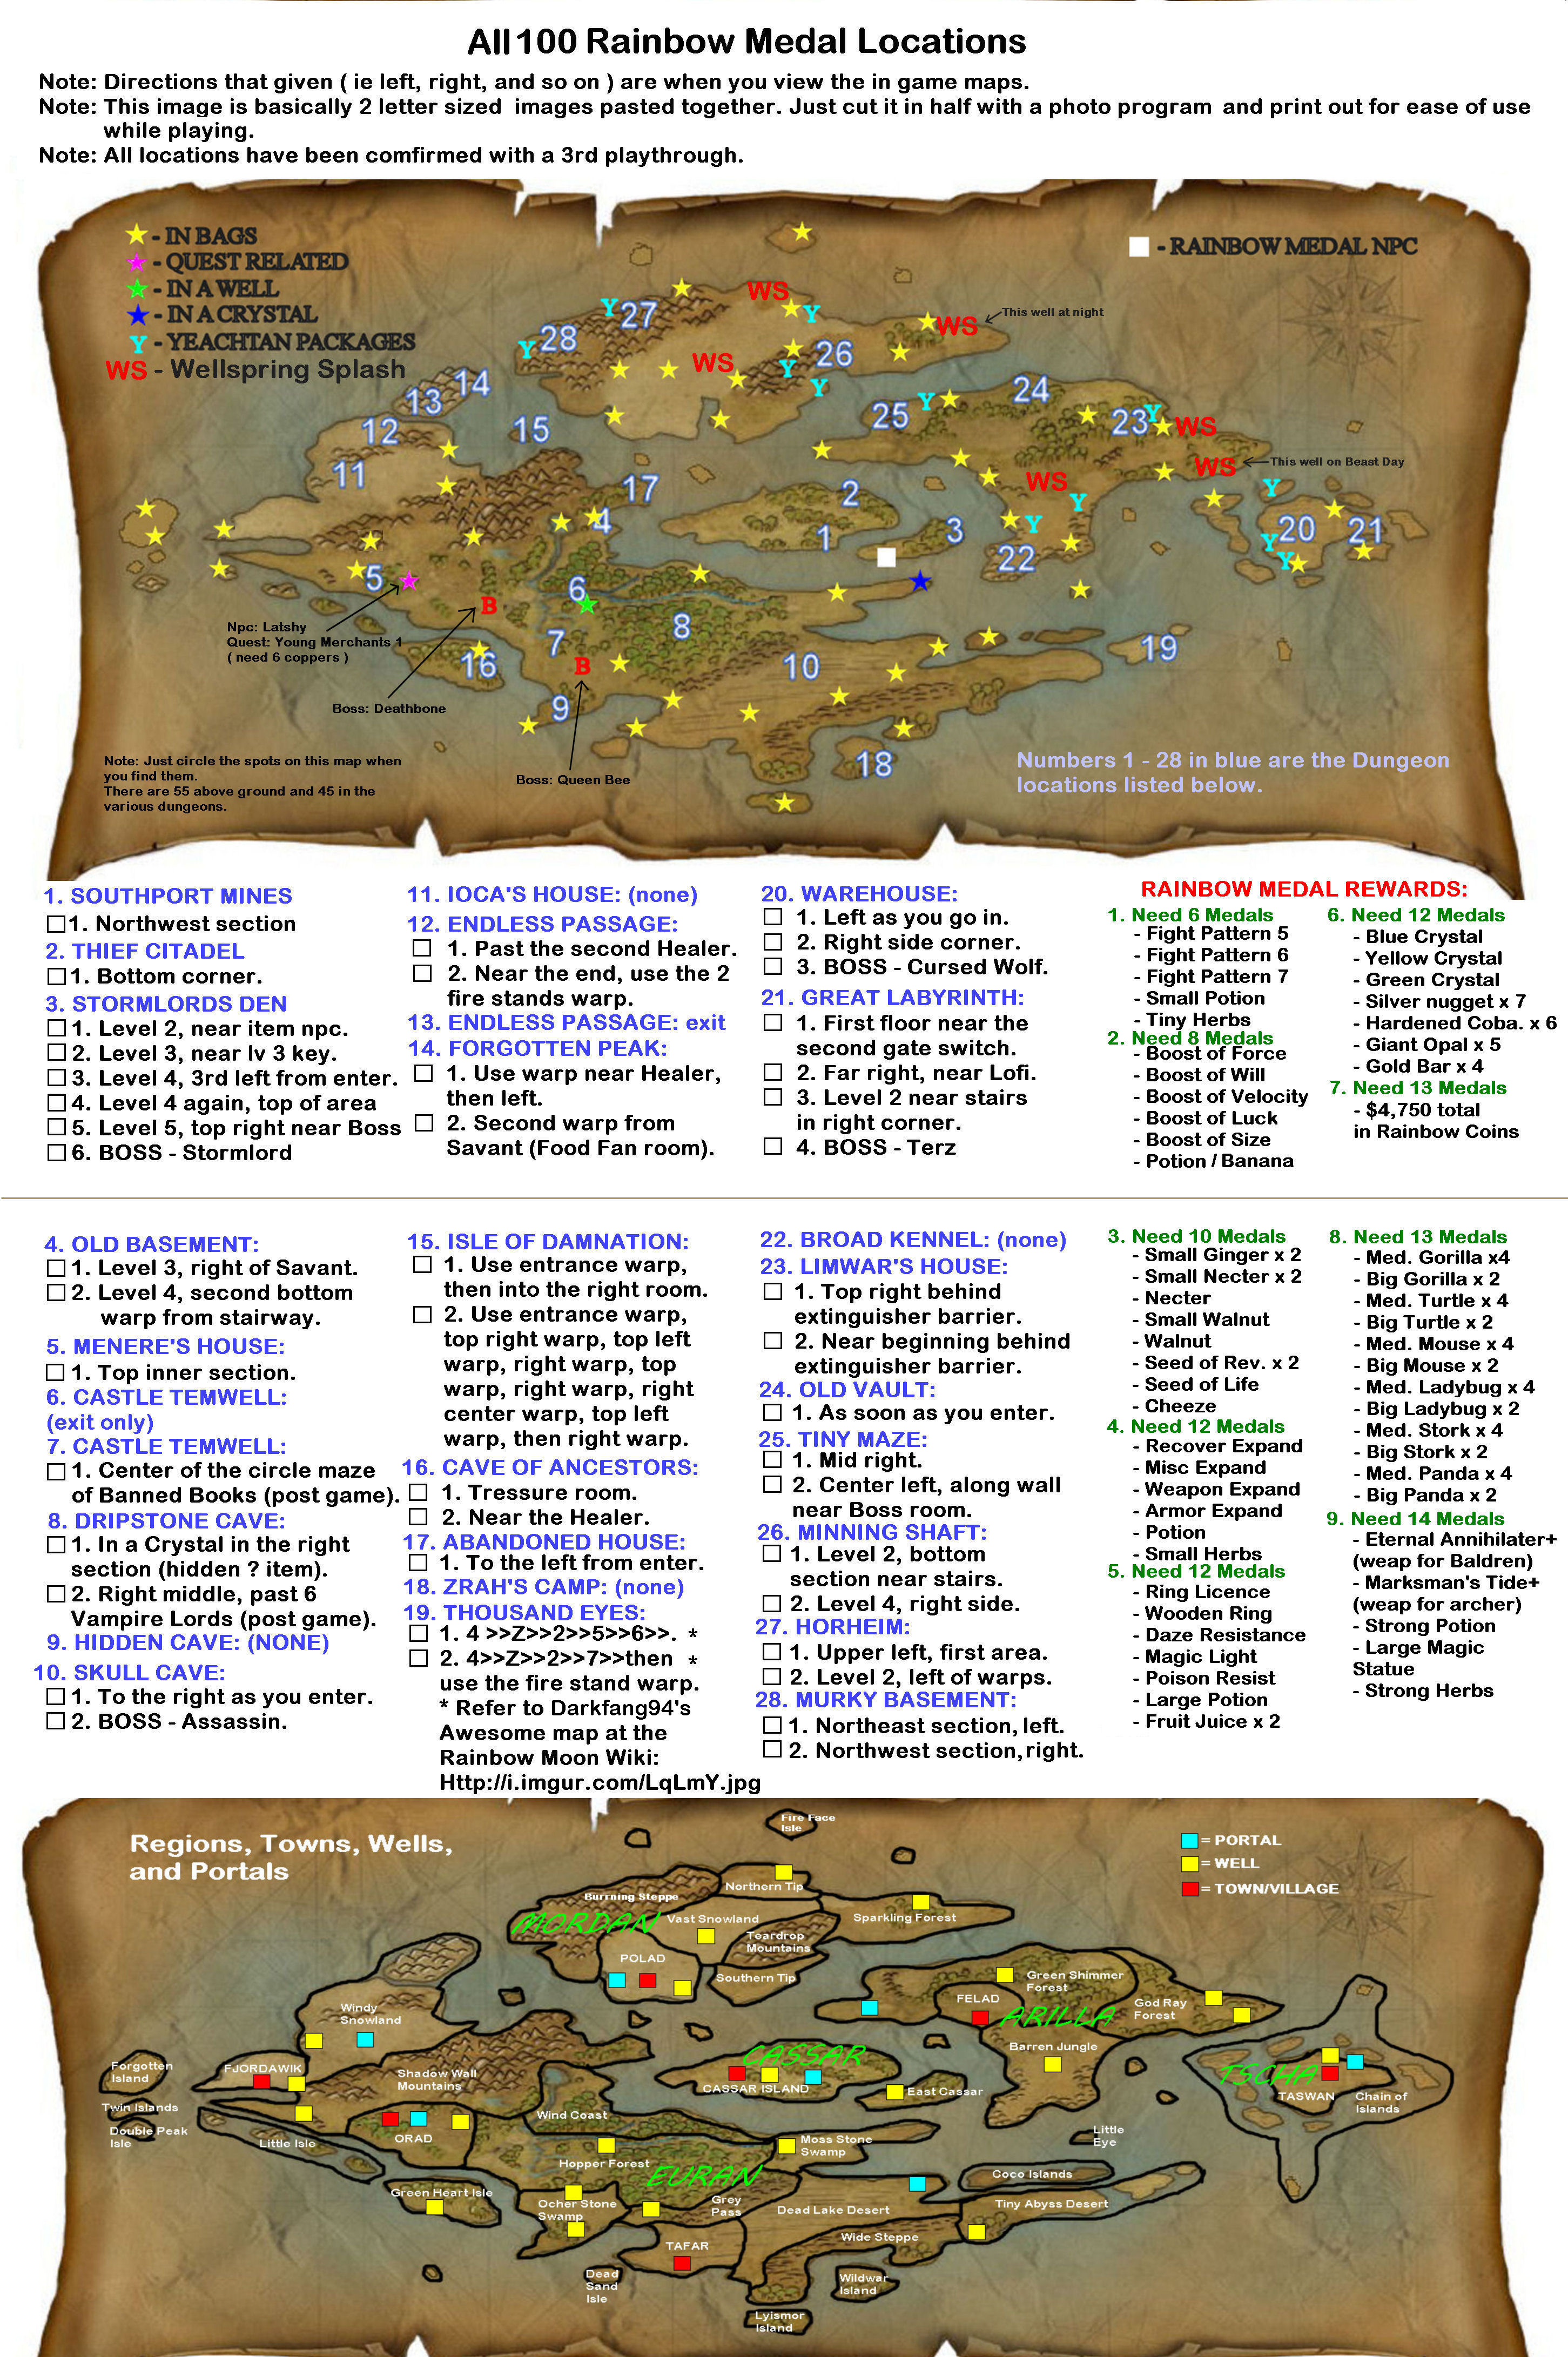
- Rainbow Medal (top northeast area)
- Magic Light scroll (top northwest area)
After you're done, head out of the mines and back to Ed Orable and speak to him.
Main Quest:
"Ed Orable thinks that the old wise man Tondraest can help you to leave Rainbow Moon. Tondraest lives in Orad which is the capital of Euran. You have to travel there by boat. Ask the townsfolk of Cassar Village how to get there. Don't forget to bring Merridon the axe from Sarrothrod that he's waiting for in Cassar Village."Head back to Cassar Village and speak with Merridon.
Main Quest:
"People start beginning to trust you. Merridon is sure Stella has an interesting offer for you. You'll find her in the garden, next to the well, in Cassar village."Head out to see Stella, who is by the well in the village.
Main Quest:
"Good news! Stella offers an opportunity for a passage to Euran. However, she wants you to fight the well monster. To entrap the monster, Stella came up with the idea to fill the well with poison, but the flask was stolen by thieves. Go to the Thief Citadel and bring the Poison Flask back to Stella. There's a hidden passage to the Thief Citadel in Ed Orable's garden."Go back and speak to Ed Orable. He gives you a Ladder to cross the pit near his hut. Shortly after passing the pit, you will run into Trisha, who joins your quest and becomes your second playable character. She also gives you the key to the Thief Citadel, which lies to the north. On your way there, stop by the little alcove to the northeast and raid the Chest for the Painful Aim (Scroll).
Note:
Before heading into the citadel, go back to Ed Orable who offers another sidequest:
- Lifeless Stones
Enter the Thief Citadel and use the key Trisha gave you.
Notable items found in the Thief Citadel are as follows:
- Fight Pattern 02 (first Chest near the entrance)
- Map of Thief Citadel (left from the entrance in a Chest)
- Fruit Rain (Scroll) (Chest near the Scroll Shop)
- Rainbow Medal (Bag in the southwest section)
At the end of the area, you will face your first story line Boss:
- Crystal Lord
After you beat the Boss, head back to Stella with the Poison Flask it drops.
Main Quest:
"Very good! All you have to do now is to prepare yourself for a decent fight and wait for midnight. Just check the well during the first hour of the day - that's between 0:00 and 0:31 - and be well prepared. Keep in mind that you can use the camp to speed up your wait."After you've spoken to Stella, talk to Eccmold again. He offers to give you a Recommendation to give to Melfuss. Give the Recommendation to Melfuss. Melfuss can be found near the signpost that is at the south entrance to Cassar Village. This starts another Side Quest:
- Improved Toys
Run around until 0:00 and check the well. This will trigger a fight with a Boss:
- Sniper Imp
Return to Stella after the boss fight to receive the Harbor Gate Key.
Main Quest:
"Good Job, with the Harbor Key from Stella, you're now able to enter the harbor area in the south-west of Cassar Village. Bring some Rainbow Coins and you can rent a raft for the passage to Euran. (Note that the raft shop is closed at night!) Just enter your raft and head to the west. Euran is waiting! Here we go..."Grab a raft from the Raft Shop (Boat Rental) and head west to Euran. When you arrive, speak to the blue haired dude (Gorodo)
Note:
After speaking with Gorodo, the shops have new items (Shop Level 1). You can take a break from the main quest and get back in you raft and head east past the docks and follow the southern shore until you reach East Cassar (a small island southeast of Cassar Island). On this Island, buy the new scrolls and items from the shops there, then speak with the nearby NPC Arnefon. He is the NPC who deals with all of the Rainbow Medals that you find throughout the game and starts the subsequent sidequest titled:
- Rainbow Medals
Also, on the Northern part of that island is a chest which contains the Level 1 Key for the nearby Stormlord's Den dungeon. You can use the key and attempt the first section of this dungeon (Level 2), if you are around level 10. Make sure you buy Antidote Flasks at the Item Shop before you start. Completely explore the first section (Level 2) and you will be rewarded with the following items:
- Rainbow Medal (near Item Shop NPC in the west section)
- Level 2 Key (North section)
Note that you'll have to come back later when your around level 20 to do the Level 3 area as there are tougher monsters there.
You will also want to check the well on East Cassar. In the southwest section of the well, there is a chest. In the northeast section of the well, there is a secret path to a warp which leads you to a closed off section in the Stormlord's Den. The 3 bags in there all contain permanent stat boost items.
Now onward with the main story. Return to where you met Gorodo.
Main Quest:
"The people on Cassar Island told you that you should find a wise old man in Orad. But the passage was blocked by some warriors who are trying to defend the capital against the monster threat. One of them is Gorodo. Begajia, one of his girlfriends, is in trouble. Try to find Begajia and help her! The merchants have new goods. Time for shopping..."Head south from the area with Gorodo, past the healer, item shop, etc. to find Begajia standing in front of a tent. Talk to her.
Main Quest:
"You have found Begajia at a camp surrounded by monsters at Wind Coast. Begajia is not afraid of this situation but she is angry because the monsters have stolen her Comb. You are not sure what to fear more, the monsters or the rage of Begajia. You should find the Comb near to Begajia, in a bag. It is guarded by a skeleton."Just a few steps west from Begajia is a bag being guarded by a Skeleton mob. Engage and defeat these enemies. Pick up the bag to find Begajia's Comb. Return it to Begajia to receive a quest reward.
~Quest Reward~
Small Potion x2
Small Stork
Main Quest:
"Begajia is satisfied. It's time to visit her adored hero. Gorodo is still in the north of Wind Coast."Return to and speak to Gorodo up north.
Main Quest:
"Gorodo wants to do Begajia a favor. The Gretting Card is in a bag near Barob in the north of Wind Coast."Head north from Gorodo. Just past Barob is a Poison Imp mob. Engage and defeat this mob, and grab the bag just behind them. Take the Greeting Card and return it to Gorodo to receive a quest reward.
~Quest Reward~
Flower Bouquet
Map of Orad
Note: At this point, side quest #5, The Flowers, is unlocked. The side quest speaks as if you've already given the Flower Bouquet to Begajia, even if you have not.
Main Quest:
"The real problem for Gorodo is that he has lost his mojos in battle. Because he is very superstitious, he needs these pieces of jewelry. If you bring him his mojos, you will have a strong companion in your struggle with monsters. Start your search for the mojos in a small village in the south-east of Wind Coast."Head south east of Gorodo, past the crafter, to find another small village. Speak to Tef, who is enclosed by a fence, to receive a quest reward.
~Quest Reward~
Garden Shears
Main Quest:
"You have encountered an inhabitant of Wind Coast. Tef is aware of a camp of thieves in the south-west of this region. He gave you his Garden Shears to open the door to this camp. Once you have found the mojos, return to Gorodo. I am sure that he will be delighted! Visit him at his house in the north of Wind Coast."A few steps directly to the east of Tef is a door that can be opened with the Garden Shears. Do so and enter the camp of thieves. Defeat the Thief mob. Grab the treasure chests behind them to find the Mojo of Tears. Return to Gorodo and deliver the Mojo of Tears.
Main Quest:
"The situation in Wind Coast is now safe. Gorodo instructed Tapden to open the passage to Orad."Head south west from Gorodo to find an NPC named Tapden. Talk to him to receive a quest reward.
~Quest Reward~
Passage Key
Main Quest:
"The situation in Wind Coast is safe now. Gorodo still misses two of his mojos. He thinks that another warrior could help with the mojos. Dozeru can be found in Hopper Forest. You can ask Tondraest for help in Orad."Use the Passage Key on the door just to the left of Tapden. Proceed to the center of Orad to find Tondraest and talk to him.
Main Quest:
"After a long search, you finally found Tondraest, but he is refusing to help you. He thinks that you have a close relationship with these monsters. Tondraest needs proof of your sincerity. The passage to Dozeru is also blocked. You have to find a way to open the gate."Find Thoras in town, near the tavern. Speak to him.
Main Quest:
"Thoras, a resident of Orad, knows that the key for the passage to Hopper Forest is in the possession of his cousin Meneres. You can find Meneres's house a bit outside, in the west of Orad."Head west out of Orad to find Meneres. Speak to him to receive a quest reward.
~Quest Reward~
Meneres's Key
Main Quest:
"Meneres's house in the west of Orad is crowded with monsters. He assumes that these creatures are your friends. After you have fixed the mess, it should be a good idea to ask for the key that opens the gate to Hopper Forest."Use Meneres's Key on the gate immediately to the right of Meneres. Enter Meneres's House. Work your way to the center of the dungeon by pulling the levels around the edge of the map. In the center, find, engage, and defeat the boss, Zhaytray. In addition to the boss, this includes 2 Mad Dogs, 3 Skeletons, 1 Thief, and 1 Earth Golem.
Main Quest:
"The issue in Meneres's house is solved. See if you can get the key from Meneres in the west of Orad."Leave Meneres's House and talk to Meneres. You will be prompted for a fight, but are offered the chance to cancel if you wish to prepare. This fight contains 1 Skeleton, 3 Mad Dogs, 1 Poison Imp, 1 Earth Golem, 2 Thieves, 2 Wannabe Heroes, 3 Tiny Bees, 4 Trial Imps. Win this fight and speak to Meneres again to receive a quest reward.
~Quest Reward~
Misc Expander
Rusty Green Key
Main Quest:
"Meneres has a strange personality but finally you have the key to Hopper Forest. The gate is located in the south of Orad. You will find Dozeru near the gate. He is a brave knight... Prepare to meet him in battle with the monster hordes."Head south east from Meneres and keep walking along Orad's wall. You will come to a gate. Open it with the Rusty Green Key. Enter Hopper Forest. Find Dozeru a few steps to the east from the entrance. Speak to him to receive a quest reward:
~Quest Reward~
Wooden Toy
Main Quest:
"Finally, you found Dozeru in Hopper Forest. He knows where one of Gorodo's mojos is located. He offers assistance to fetch it but first some things need to be organized. Dozeru has to reequip. In the meantime, he sends you on a dangerous journey to his nephew Fais in Orad. Very dangerous! To bring back his toy. Very important! You'll find Fais near the portal in Orad."Return to Orad, entering via the town gate directly opposite of the entrance to Hopper Forest. Fais is just inside this gate. Speak to him and deliver the Wooden Toy to receive a quest reward.
~Quest Reward~
Special Edition
Main Quest:
"Your mission is becoming more important. You have to smuggle out a comic special edition for Dozeru. Complete failure would be unforgivable. You just hope that Dozeru is ready for the trip."Exit Orad and return to Hopper Forest. Speak to Dozeru and deliver the Special Edition.
Main Quest:
"Your mission with knight Dozeru takes a dramatic change. Dozeru is hungry! Fais in Orad should have knowledge about his eating habits."Exit Hopper Forest once again and return to Fais in Orad. Speak to him to receive a quest reward.
~Quest Reward~
Food List
Main Quest:
"Dozeru's big appetite becomes an official issue in the city of Orad. Ask Mayor Arcus for the supply of food."Head north from Fais and find Mayor Arcus. Speak to him and deliver the Food List.
Main Quest:
"Thoykal, the assistant of Mayor Arcus in Orad, can help you along with the Barrel of Beer you need for Dozeru. You also need three Buns, which can be bought at the item shop in Orad. Once you have all the ingredients, bring them back to Fais."Speak with Thoykal (East of the Portal in Orad).
Note: You do not need to find/speak to the NPC noted in the quest, Thoykal, in order to pick up the Beer Barrel.
Main Quest:
"The Barrel of Beer can be found in Orad, on the other side of the fence, next to Thoykal. There is a storage with many barrels. Search for the last full Beer Barrel there. The hope is that these monsters don't like beer as much as Dozeru does. You also need three Buns, which can be bought at the Item Shop in Orad. As soon as you have all ingredients, bring them back to Fais."Buy 3 Buns from the item shop in Orad (if you don't already have 3). The Beer Barrel can be found on the northeast side of Orad, in a small patch of trees directly south east of the graveyard.
~Quest Reward~
Parcel for Dozeru
Main Quest:
"You managed to get all the food together. Dozeru in Hopper Forest will be happy about the parcel and in the meantime he hopefully managed to get his helmet back."Return to Hopper Forest and speak to Dozeru. Deliver the Parcel for Dozeru to receive a quest reward.
~Quest Reward~
Comic Collection
Speak with Dozeru again to receive:
Dozeru's Camp Key
Note:
At this point, side quest #49, Comic Collection, is unlocked.
Main Quest:
"Dozeru was not able to get his helmet. He is not as brave as you had expected, but who cares? You have the key to his camp. The entrance to the camp is north of Dozeru's location. The helmet is guarded by Death Bone, a really bad egg. Once you have the helmet bring it back to Dozeru."Use Dozeru's Camp Key on the gate just above Dozeru. Engage and defeat the Death Bone mob. This fight contains Death Bone (boss) x1, Poison Imp x2, Skeleton x3, Walking Bone x3. After the fight, open the chest to the left of where Death Bone was and take Dozeru's Helmet. Return to Dozeru and deliver the helmet to receive a quest reward.
~Quest Reward~
Small Potion x2
Beer Barrel
Pot of Pain
Note:
At this point, Dozeru joins your party, and the trophy "Dozeru" is unlocked.
Note:
This may be a good time to go back to Orad and raid the new shop items (scrolls, weapons and armor) specifically for Dozeru, since they are now available.
Main Quest:
"Dozeru has joined your party. Trisha already misses parts of her provisions. Don't forget to have enough food in stock! Dozeru thinks that one of Gorodo's mojos is in a basement. You'll find the entrance of Castle Temwall in the south-west of Hopper forest. It is surrounded by a stone wall. Tingard, a Town Watch of Orad, will await you there and give you further instructions."Head directly south east from where you met Dozeru. When you hit a stone wall, keep going, hugging the wall around to the east. As it curves east, there is an opening guarded by a Bad Bee. Engage and defeat this mob, and speak to Tingard to receive a quest reward.
~Quest Reward~
Stone Hammer
Main Quest:
"You met Tingard in Hopper Forest. He gave you a Stone Hammer to remove the debris at the entrance to Castle Temwall. To find the mojo, you have to enter the basement much deeper. Unfortunately a door is blocking the way inside the basement. Tingard needs the remainder of a key to complete the original key."Note:
- Before entering, you may want to do a few side quests. It is entirely up to you, since the rewards are not that great, with exception of the Rainbow Medals one which gives
you 3 new Fight Patterns. The Side Quests are as follows:
- Rainbow Medals (you should have the first set of 6 that Arnefon asks for by now)
- The Beekeeper
- The Well (doing this one unlocks The Herbalist side quest)
- The Herbalist
- Lost in Forest
Use the Stone Hammer on the glowing debris behind Tingard, and enter Castle Temwall. First head northwest to activate a lever. This opens a gate that accesses the southwest section. Go there and you'll find a chest that contains the Ocher Stone Key, a key item that you will need later. Now head out of the southwest section and go east hugging the south wall all the way until you can go south again. Follow the zig zag path all the way south to find another chest. This one contains 2 key items, the Key Remain and The Big Face. Return them both to Tingard.
Note:
- Castle Temwall is the first of a few dungeons you will run into that have magic barriers, which you cannot open without the Dematerializer, which you do not receive until after you have completed the main story line and have done the corresponding post game quest.
Main Quest:
"Tingard in Hopper Forest gave you the complete key to open the door in Castle Temwall. Somewhere in the basement should be a mojo for Gorodo. As soon as you have found it, return to Gorodo in the north of Wind Coast. Becuase of the happy discovery of a rare tressure, the people in Orad are celebrating. Even the merchants now have new offerings!"Returning the Key Remain and The Big Face to Tingard offers the following Quest rewards:
- Temwall Key
- Shop Level 2
Note:
- The Side Quest Order of the King unlocks at this time although you will not be able to finish it until much later.
After you've done your shopping, head back into Castle Temwall. Make your way to the northeast and use the key. Then follow the path until you reach the enemy boss Red Death
Beat the boss, then grab the Mojo of Torture in the chest behind him. Keep going that way and you'll leave the dungeon through it's back door. Then return to Gorodo
Main Quest:
"Gorodo is happy about his second mojo but one more is still missing. Dozeru heard rumors that the last mojo could be somewhere in Orad. Maybe there is someone who has an idea about it's whereabouts."Make your way back to Orad and Talk to mayor Arcus
Main Quest:
"Mayor Arcus cannot help with the missing mojo but he sends you to Thoykal. You are wondering about the purpose of the mayor here in Orad."Make your way to Thoykal who is in his garden just southeast of the mayor.
Main Quest:
"Thoykal told you that a merchant called Rhaty is selling Gorodo's mojo. You will find the merchant's camp in the west of Orad. It is located outside the city at the coast in the south."Make your way to the merchant's camp located just west of Orad along the coast until you find the merchant Rhaty. He tries to sell you Gorodo's mojo for an obscene amount of money. You steadfastly disagree and a battle ensues. After you win the battle he hands over Gorodo's Mojo of Trust
Main Quest:
"Rhaty was selling the last mojo for a pretty cheap price. Irresistible offer. But when Rhaty became cheeky, you showed him who the boss is. Now travel back to Gorodo in the Wind Coast rapidly."Go back to Gorodo and give him his Mojo of Trust. He will then give you Gorodo's Key.
Main Quest:
"Gorodo is happy about the last mojo. Most of the monsters are gone and Gorodo decided to join your party. Any more of these freaks and you can open a circus. Gorodo has a little gift for you, an old artifact in his house at Wind Coast, which is full of monsters. You are not sure if you want to call it a "gift" but it's better than a Comic Collection and a Barrel of Beer."Make your way into the nearby house (Old Basement) and use the key. Make your way down the levels of this dungeon. When you get to level 4, the room is surrounded by Dungeon Warps. The one with the archway beside the treasure chest, it will lead you to the shops and a Healer. You can challenge all the warps in that room if you like, but the one that leads to level 5 is the one in the top west. When you get to level 5, you will face the Glow Golem Boss. Defeat it and grab the contents of the Chest behind him, which are the Traveling Bag and the Charged Magnet Coil. Then return to Gorodo.
Main Quest:
"Gorodo from Wind Coast is a proud warrior. He wants to join your party but he first needs to be beaten in an amicable battle due to the rules of his tribe. Odd way to join a party. But this isn't your country... yeah not even your world."You need to battle Gorodo now because his tribal rules do not permit him to join your party otherwise. So fight him. Afterwards, he becomes the forth member to join you on your quest.
Quest reward:
- Wannabe Blade+
Main Quest:
"Gorodo has joined your party and Trisha is in a cheerful mood. But this artifact could be really interesting because there seems to be a connection between the monsters and the artifact. The situation around Orad is safer now. Maybe Tondraest in Orad can tell you something about the artifact."Go back to Orad and talk to Tondraest
Main Quest:
"Tondraest seems to be a wise man. You tell him your story and he starts to explain to you more about the portals. Long ago, people of Rainbow Moon used the portals to travel to other worlds but due to conflicts with some of the realms they decided to stop this connection. He told the Portal Adept to give you an introduction. You find the adept in the south of Orad."Go and talk to the Portal Adept who is standing beside the Warp Portal in Orad
Main Quest:
"While the Portal Adept was trying to establish a connection, an accident happened. A strange person appeared in the portal in Orad. You seem to know this person!"Go speak with Namoris who appeared near the portal.
Main Quest:
"Namoris is back. The person who is responsible for this total mess is stranded on the same planet. It seems that Namoris isn't too happy about being stranded here either. See if the Portal Adept in Orad is fine."Return to the Portal Adept
Main Quest:
"The Portal Adept sends you to Tondraest to report this accident. You'll find Tondraest near the market of Orad."Return to Tondraest
Main Quest:
"Tondraest sends you back to the Portal Adept in Orad to continue your portal introduction."Return to the Portal Adept
Main Quest:
"The Portal Adept has given you access to the portal. Go through the portal and talk to Okimocery at the portal on Cassar Island."The Portal Adept gives you the Portal Pickaxe. Use it on the big stone blocking your way to the Warp Portal. Then go through the portal and speak with Okimocery who is standing near the portal on Cassar Island.
Main Quest:
"You have woken up Okimocery on Cassar Island and now you can travel back to the portal of Orad. The Portal Adept will be happy to meet you again."Now go back through the Warp Portal and speak to the Portal Adept
Main Quest:
"You have finished your portal introduction. You already know two portals but there are more spread all over Rainbow Moon. Maybe it's time to talk to Tondraest in Orad about the artifact that you have found in Gorodo's basement."Go back and speak with Tondraest
Main Quest:
"Unfortunatly, Tondraest has no clue about the secret of Gorodo's artifact. His advice is to follow Namoris through the portal. See if the Portal Adept in Orad can help you."Go back and speak with the Portal Adept
Main Quest:
"Namoris used the portal to escape into the north of Euran. He blocked his destination. You need to find another way to follow him. Ask Tondraest in Orad for help."Go back and talk to Tondraest
Main Quest:
"Tondraest has no direct idea how to return to your home world but he believes that the best thing is to follow Namoris to the north. Melt, his assitant in Orad, will explain how to get to Shadow Wall Mountains."Go speak to Melt who is nearby.
Main Quest:
"Melt has given you a hammer to open the passage to enter Shadow Wall Mountains. You will find the passage in the north of Orad. It is blocked by a big stone. When you have entered this region, search for Namoris or another person who could help you with the artifact."Melt gives you the Little Stone Hammer. Go to the north area of Orad an use it on the stone there to gain access to the Shadow Wall Mountains.
The First person you run into will be a Hunter, who will give you the Side Quest:
- Mountain Hunt
From the position of that Hunter, head east, then northeast to find an NPC (for now) named Serena and talk to her.
Main Quest:
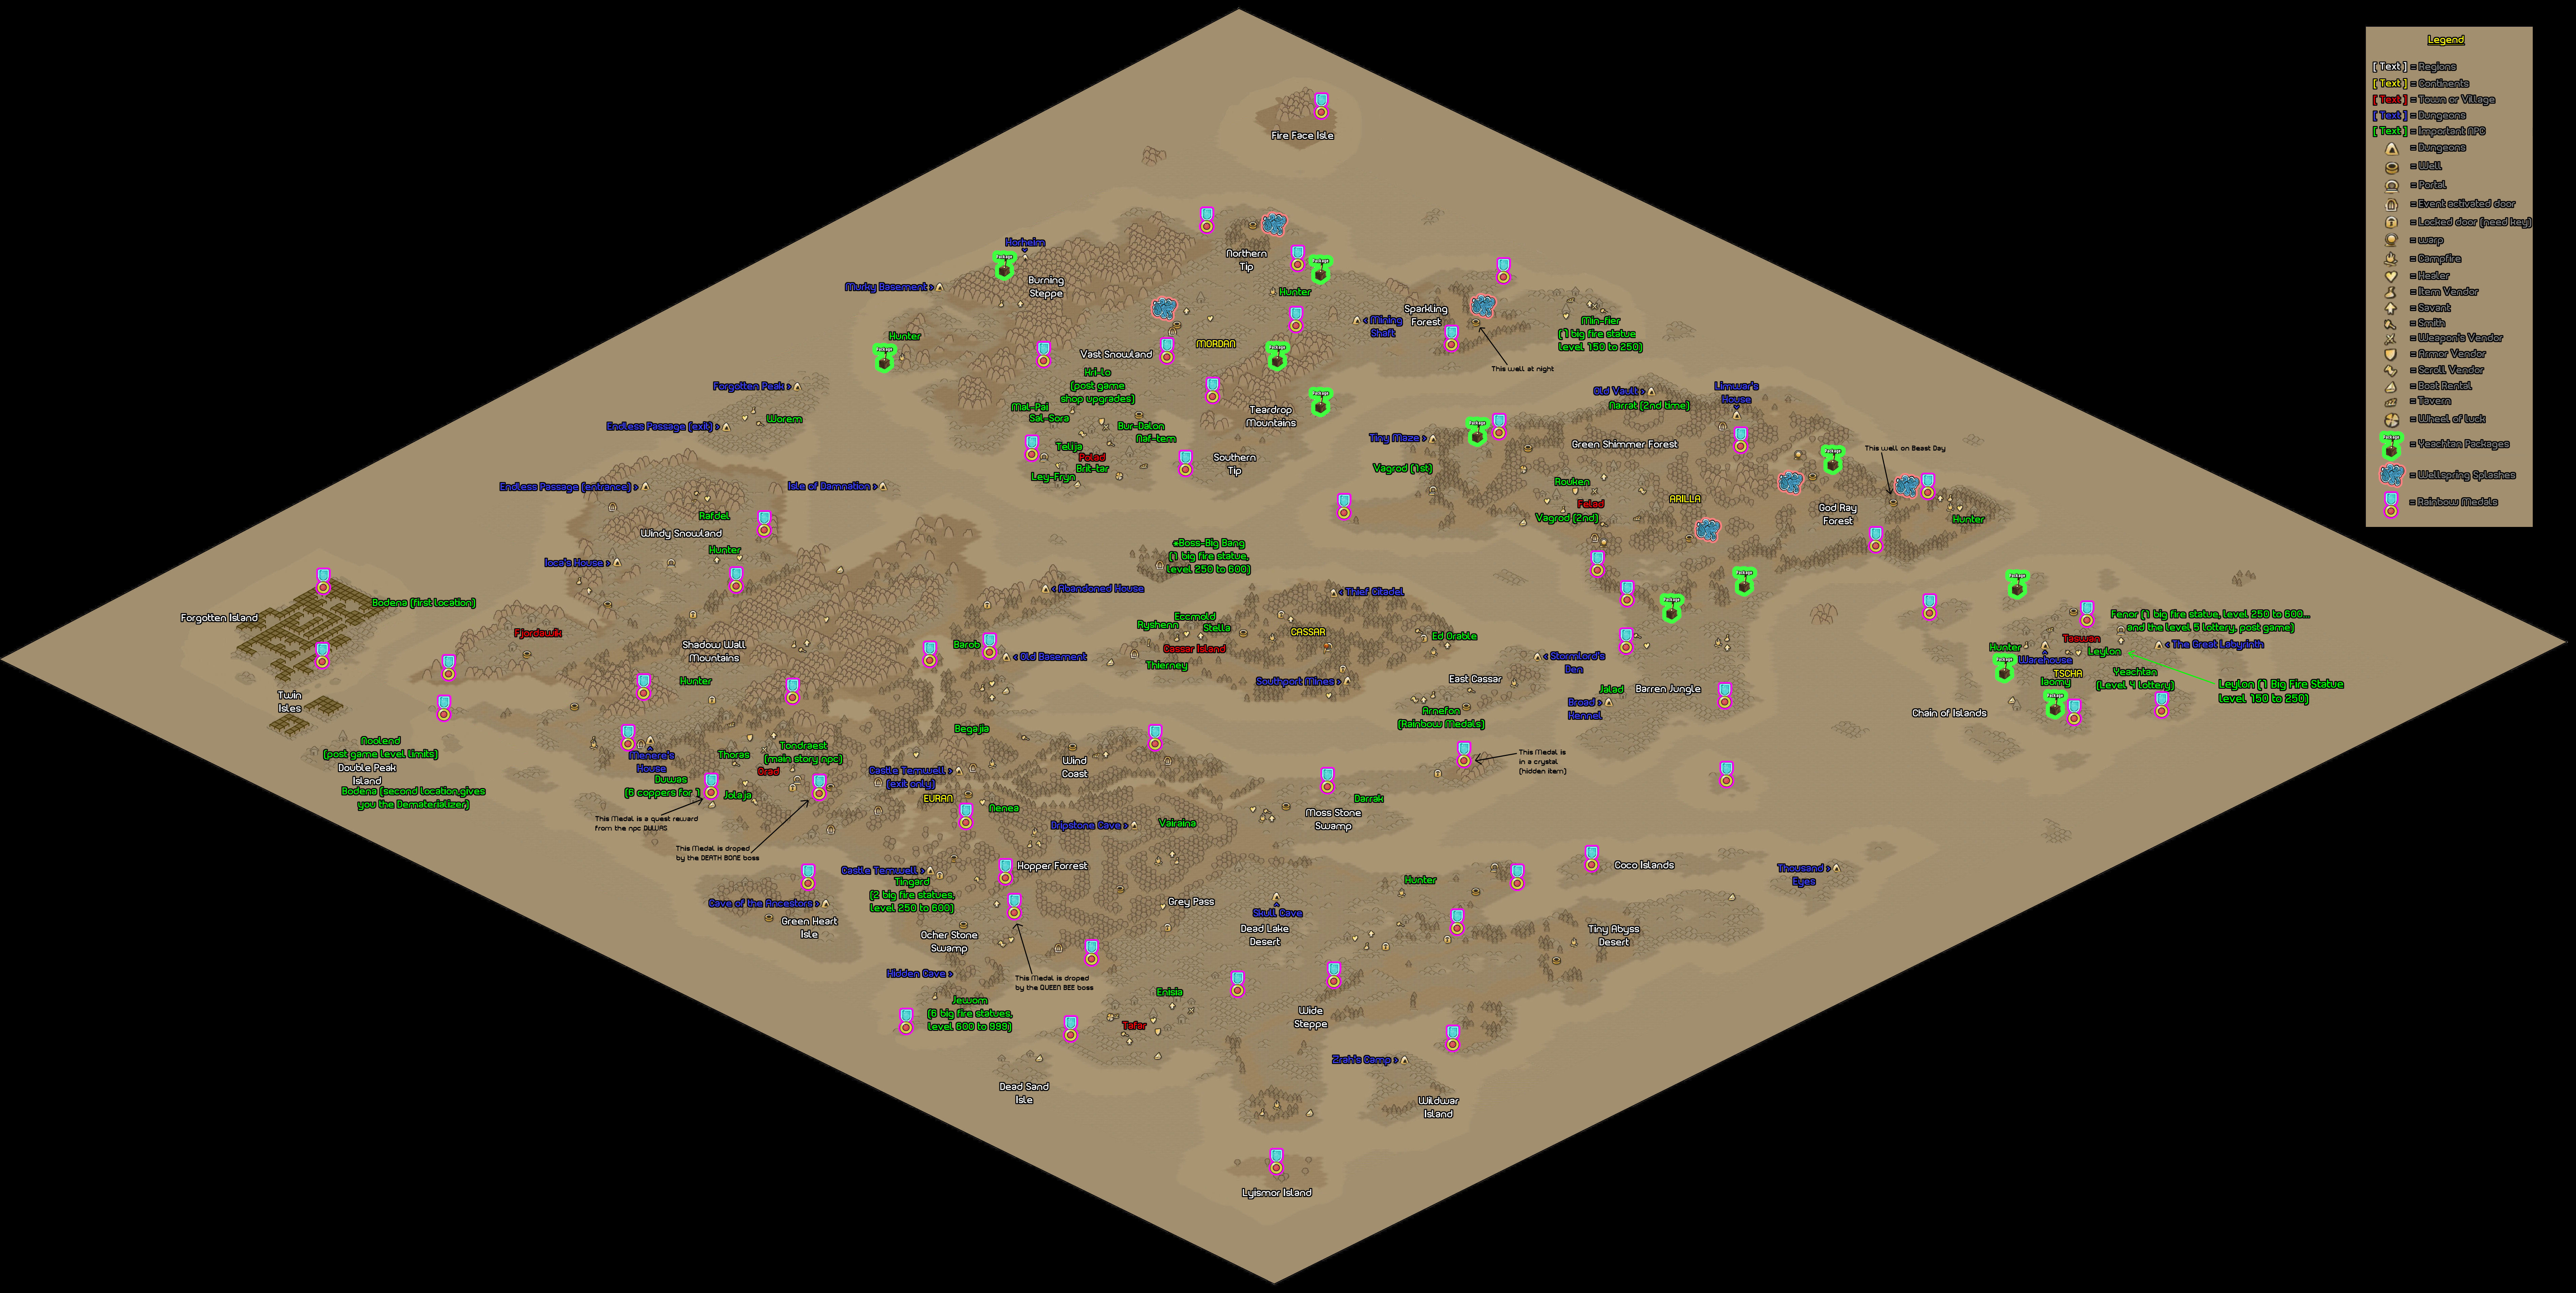
"Serena, a magician in Shadow Wall Mountains, is also searching for artifacts. She thinks that they could give protection against the monster menace. Serena could be a good starting point to get more information about the artifacts. She is searching three Text Fragments in this region. Bring her the three Text Fragments to learn more about the artifacts."Serena wants you to find 3 Text Fragments that are somewhere within the Shadow Wall Mountains. Refer to the map below for their locations:

After you found them all, return to Serena
Main Quest:
"Elden, Serena's assistant, went missing during the search for an artifact. Serena wants to wait in the camp for his return but she additionally asked you to search for her assistant. She thinks that he could be somewhere in the east of Shadow Wall Mountains. The merchants are also storing new stuff. The shops could have new offers!"At this point, Shop Level 3 is unlocked. So go shopping before anything else.
When your done shopping, head out to the eastern section of the Shadow Wall Mountains along the coast to find Degar and speak with him.
Main Quest:
"Degar from Shadow Wall Mountains has seen Serena's assistant. Elden is in the Abandoned House but you cannot follow him because a Magic Stone is blocking the passage. Go back to Serena for help."Elden was nowhere to be found, but you'll run into NPC Degar who tells you Elden is in the nearby Abandoned House, But it is blocked by a Magic Stone. You need to Return to Serena
Main Quest:
"Serena has given you something to enter the Abandoned House. Go to the east of Shadow Wall Mountains and see if you can find Elden in that house."Go back and talk to Degar
Main Quest:
"You will find Elden, Serena's missing assistant, inside the Abandoned House, which is located east of Shadow Wall Mountains."Now use the Wonder Powder that Serena gave you on the Magic Stone that is blocking your path to the Abandoned House. Go inside the Abandoned House and search for Elden.
Main Quest:
"You found Serena's jittery assistant. Elden was talking woozily about things but it seems that Namoris has snatched the artifact away. You should follow his trace. Start with Degar and ask him if he has seen something."Go back and speak with Degar
Main Quest:
"Degar has seen someone running out of the Abandoned House. Namoris has escaped north from Degar's position. Search north-east of the Shadow Wall Mountains."Go north from Degar's position and find Larror the fisherman and speak to him.
Main Quest:
"You have encountered a fisherman on the search for the thief of the artifact. He has told you that the person has run to Lomos, who rents boats. Lomos shop is located in the north of Shadow Wall Mountains."Make your way west of Larror's position and search for Lomos and speak to him.
Main Quest:
"Namoris is on a small island, the Isle of Damnation. The isle is located in the north of Shadow Wall Mountains. You should find Lomos with his boat rental at the coast of the mainland. There you can rent a raft to get to the isle."Go to the nearby Boat Rental and rent a raft. Go north to the little island and enter the Isle of Damnation dungeon and speak with Syina at the entrance.
Main Quest:
"Namoris has escaped with the stolen artifact into an old dungeon in the north of Shadow Wall Mountains. Isle of Damnation is very huge and jam-packed with many riddles. Try to find the stranger in this huge maze."Syina gives you a Rusty Key. Use it to open the gate at the entrance of the Isle of Damnation. Search for Namoris within. Note that you'll some run into numerous Dungeon Warps leading you all over. It can be frustrating at times, so refer to the map to help guide you.
Notable items found in the Isle of Damnation:
Almost Sword+
Fight Pattern 09
Mask of Nonsense+
Vest of Nonsense+
X-Ray Review (Scroll)
Main Quest:
"Namoris was very attached to the new artifact. He was in the same situation as you and wants to escape from this world. This artifact could be more important than you thought. Travel back to discuss this with Serena in Shadow Wall Mountains."Have your battle for the first time with Namoris. After you defeat him, he gives you the Fused Twilight Gem. Then return to Serena.
Main Quest:
"Serena has found out that the second artifact has something with Gorodo's artifact in common. She believes that this is an important information for Tondraest in Orad. She joins your party to give you advice about the artifacts. A magician in the party represents an enrichment to the group. At least, this is your hope."After talking with Serena, she joins your party and becomes the fifth member. Go back to Orad and buy the needed items for Serena, especially scrolls, from the shops now that they are available. Then go speak to Tondraest.
Main Quest:
"Tondraest confirms Serena's assumtion. He even thinks that there are more parts. A human is collaborating with monsters to terrorize the people of Tafar. There are rumors that he is using an artifact to do that. Tafar is a big town located in the Dead Lake Desert. This region is located in the south-east of Euran. Melt, the assistant of Tondraest, has more information for you."Speak to Melt in Orad
Main Quest:
" Melt has given you a saw to fell a tree which is blocking the passage to Dead Lake Desert. Tondraest thinks that there is a human in this area who possesses an artifact that corresponds to the artifacts you have already found . Tafar lies in the west of Dead Lake Desert. You have to travel through Hopper Forest to get there. It should be no problem to get information about this oppressor."Melt gives you a Little Wood Saw. Travel through Hopper Forest to the south until you reach the glowing tree, Use the saw on that tree to gain access to the Dead Lake Desert region. Then go to the west and enter Tafar and speak to Haisawar.
Note:
While traveling through Hopper Forest, you may want to start and finish the following side quests
- The Queen Bee (use the Ocher Stone Key you got in Castle Temwall to access the Ocher Stone Swamp, then head south to find NPC Jewom to start the quest)
- The Crazy Old Man I (Narrat is the NPC who starts this quest. He is located in the entrance of the Dripstone Cave, which is a dungeon located east of Castle Temwall in Hopper Forest).
Main Quest:
"The people of Tafar need your help. They are enslaved by an evil human with his collaborating monsters. They regularly have to deliver Honey Cakes to the monster horde. Qoija manages the deliveries."Go to speak to Qoija, who is just west of Haisawar
Note:
Tafar is the first place that you can start playing the Wheel of Luck Lottery. It may be a good time to start playing, and for better results, try using the lottery trick outlined on the Lottery page.
Note:
You can also talk to NPC Enisia in the east part of Tafar to start the following side quest:
- Young Merchants II (you can use the Warp Portal in northeast Dead Lake Desert to speed up this side quest).
Main Quest:
"Qoija has a little job for you. You should ask Tifri, a resident of Tafar, about the whereabouts of the honey. Qoija needs the honey to bake cakes for the monsters."Go and speak with Tifri, who is beside a house east of the Healer's tent in Tafar
Main Quest:
"Tifri is totally exhausted. The monsters have destroyed the beehives, so there is no more honey to bake the cakes. This could become a serious problem for the folks of Tafar. Ask Qoija for help!"Go back and speak with Qoija.
Main Quest:
"Qoija wants to bake a different cake as a substitute. Therefore, she needs some special ingredients. Tifri has the Palm Syrup. Further ingredients are six Cactus Blossoms from the Scorpions in Dead Lake Desert and three Sand Roots from the oasis. Once you have all ingredients, return to Qoija in Tafar."Go back to Tifri.
Main Quest:
"You got the Palm Syrup from Tifri. You still need further ingredients for the alternative cake, which are Six Cactus Blossoms from the Scorpions in the desert and three Sand Roots from the oasis. You can find all of these ingredients in Dead Lake Desert. As soon as you have all of the items, return to Qoija in Tafar."Tifri gives you the first ingredient: Palm Syrup. Fight the Scorpions in the desert to get the six Cactus Blossoms (remember to leave one enemy alive to grab the bags that drop on the battle screen to speed this up). You will find the Desert Roots in the Oasis pockets throughout the desert - they are marked with a sign.
Once you've found all the ingredients, return to Qoija
Note:
While traveling through Dead Lake Desert, who will find a Campfire and a Warp portal in the northeast. There is an NPC named Hunter near the campfire who offers the following side quest:
- Desert Hunt
Main Quest:
"Qoija in Tafar has all of the ingredients. Now she needs time to bake the cake. In the meantime, visit Haisawar and talk to him about the next steps."You receive the Cactus Cake that Qoija made from Haisawar. Go rent a raft from the Boat Rental and head southwest to a small isle to confront Zelorus
Main Quest:
"You have the cake. Now it's time to visit the oppressor of Tafar. The isle of Zelorus is located in the south-west of Tafar. You have to take a raft to get there."Main Quest:
"Zelorus is terrorizing the people of Tafar but right now he has his own problems. Craustat, one of his important monsters, ran away. Zelorus asks you to find his friend Teyvan in the east of the desert. Teyvan might know where Craustat is hiding. You are not sure why you are helping him but your new mission sounds a little bit more exciting than collecting ingredients all day long."Go and find Teyvan near the campfire in the east of Dead Lake Desert and speak to him.
Main Quest:
"Teyvan told you something about Craustat. The fellow of Zelorus is hiding in a dungeon in the north-west of the Dead Lake Desert. The dungeon lies at the foot of the Grey Pass mountains. However, Teyvan doesn't think that Craustat is willing to come back to Zelorus."Teyvan gives you Teyvan's Key. Go to the northwest area of Dead Lake Desert and find Skull Cave. Enter and use the key to gain access.Work your way through the dungeon until you reach Craustat.Just before you get to him though, you'll have a boss battle to deal with: Assassin.
Notable items found in Skull Cave:
- Holly Shell+ (West section)
- Rage Panties+ (East section)
- Fight Pattern 12 (Boss room)
- Grey Crystal (Boss room)
- Rainbow Medal (East as you enter)
Main Quest:
"Craustat is not willing to help Zelorus anymore. Instead, he begs you to confront Zelorus with this situation. Craustat and Zelorus seem to have a strange relationship but that's none of your business. Confront Zelorus with this situation. He is located on a small isle in the south-west of Tafar!"Craustat gives you Craustat's key. Use it on the gate behind him to exit the dungeon. Then return to Zelorus on his Isle.
You have to battle Zelorus now. After you defeat him, he hands over the Twisted Pole.
Main Quest:
"After a long argument, you finally got the next artifact from Zelorus. The issues in Tafar are solved and you have obtained the next part of the mystic item. Everyone except Zelorus is celebrating the liberation of Tafar. The merchants have new offers! The next important step is to go back to Orad and tell Tondraest about the latest developments."Return to Tondraest in Orad, but before you do, stop by Haisawar in Tafar who give you Medium Gorilla for your efforts. Also, Shop Level 4 is now unlocked, so go shopping!
Main Quest:
"Tondraest in Orad has found out something. But visit melt first!"Go talk to Melt
Main Quest:
"Melt in Orad gives you a Ladder to cross a pitfall in the Shadow Wall Mountains to the Windy Snowland. Return to Tondraest for further imformation."Melt gives you the Map of Euran and the Snowland Ladder. Then return to Tondraest.
Main Quest:
"You should find your next artifact somewhere in Windy Snowland. The contact has gotten lost in the biggest town in this area. Try to find Fjordawik to see what happened to their residents."Head north past the Shadow Wall Mountains and use the Snowland Ladder on the pitfall to gain access to the Windy Snowland. Then head west to find Fjordawik and speak to Iocas.
Note:
- Activate the Warp Portal when you find it.
Note:
- When you get into a battle with the Steel Golem, this will be your first introduction into "Monster Merging" (the Skill is called Melting Might and will be used by many different monsters from now through end-game). The Steel Golem will Merge itself with the nearest monster to make a stronger version of itself. As an example, before it merges, it's Hit Points are 600. After it merges, It's Hit Points are 1,050 and the Golem is Buffed as well. Try to kill the monsters that can merge with other monsters first to avoid this, unless there is a monster on the battlefield that heal other monsters in which case those monsters would take first attack priority.
Note:
You can start 2 side quests now if you want
- Snow Hunt (Hunter east of where the pitfall was)
- Confront the Danger (northeast section of the Windy Snowland)
Main Quest:
"You have found the people of Fjordawik. Almost all of them have been enchanted into terrible looking monsters. At least they seem to be peaceful. The only human left is an old man. Iocas asks you to examine the reason why everyone was enchanted. Start with Denala."Go and speak with Denala just to the north of your position.
Main Quest:
"Denala is talking in a strange language to you but you think that you can understand one word, "FROG". Return with this information to Iocas in Fjordawik."Return to Iocas
Main Quest:
"The word from Denala doesn't tell Iocas anything. He sends you to Maatha. Maybe you will have more luck with this enchanted woman of Fjordawik."Go and talk to Maatha just east of your position.
Main Quest:
"Maatha is talking the same nonsense as the other people of Fjordawik. The only thing you could understand was "ARTIFACT." This could be a sign that you are on the right track with your mission! Ask Iocas if this starts ringing any bells."Go back to Iocas
Main Quest:
"Now your stay in Fjordawik is starting to become interesting. Fjordawik seems to possess one of your needed artifacts. You don't know how to get it at the moment but you think it is the best to help the people here. Let's see what Sloidan will tell you..."Go and speak with Sloidan just northeast of your position.
Main Quest:
"Well, the monster people of Fjordawik aren't that peaceful after all. Sloidan attacked you. But after you showed him who the boss is, he was babbling something about a "MAGICIAN." You have a hunch that your old friend is involved in this case. Ask Iocas for help..."After speaking to him, Sloidan attacks you. Beat him and talk to him again. Then go back to Iocas
Main Quest:
"Your concerns have been confirmed! Namoris has enchanted the residents of Fjordawik. After he didn't get the artifact, he did this terrible thing to the people and left the village. Iocas is almost sure that Namoris has traveled to a mysterious place in the north of Windy Snowland. It is the Forgotten Peak. But to get there you have to cross the Endless Passage. The name says it all."Iocas gives you the Passage key. Go to the northeast section of the Windy Snowland and use that key to open a passage to the Endless Passage. Traverse the long Passage (grabing any Ice Wings you see (below ground visible item) along the way). When you reach the exit, pull the switch at the end (this activates a Dungeon Warp that lets you bypass the Endless Passage on your return trip), then exit the dungeon. At this time, you can start the following Side Quest:
- Monster Trainer (Worem on the small island you exited the Endless Passage from... he needs those Ice Wings you collected)
Now continue on into the Forgotten Peak and traverse this rather puzzling dungeon until you find Namoris
Notable items found in the Endless Passage:
- Cheesy Coat+ (north side past the second set of shops)
- Blue Crystal (north side past the second set of shops)
- Haste (Scroll)
- Fight Pattern 20
- Blue Crystal
- Rainbow Medal (south side near the third set of shops, there are two fire stands which act as a Dungeon Warp to get you into the nearby room)
- Rainbow Medal (just past the second set of shops... in the middle under an archway)
Notable items in the Forgotten Peak:
- Faulty Tomahawk+ (behind the Sting Wasp enemy in the North section)
- Cheesy Hat+ (right of the Boss room)
- Fight Pattern 14
- Armor Expander
- Grey Crystal
- Rainbow Medal x2 (refer to this guide)
Main Quest:
"After a long and exhausting journey, you have finally found Namoris. It wasn't an easy battle but you have finally convinced Namoris to give you the spell to disenchant the people of Fjordawik. Travel back to Fjordawik to reverse the spell on the poor townsfolk."You now have your second battle with Namoris. Defeat him and he hands over the Magic Frog. Then return it to Iocas in Fjordawik.
Main Quest:
"Iocas in Fjordawik was happy to see you again. He gives you a spell to disenchant every person. Free Sloidan first!"Go to Sloidan and give him the Magic Frog Sloidan and speak to him afterwards.
Main Quest:
"Sloidan in Fjordawik is human again. Return to Iocas for the next spell..."Return to Iocas
Main Quest:
"Maatha in Fjordawik is the next person to disenchant. You are excited to see her real face."Go and give Maatha the Magic Frog Maatha and then speak to her after.
Main Quest:
"Maatha in Fjordawik is human again. Return to Iocas for the next spell..."Go back to Iocas
Main Quest:
"Denala in Fjordawik is the next person to disenchant. Hurry!"Go to Denala and give her the Magic Frog Denala and then speak to her after.
Main Quest:
"Denala in Fjordawik is human again. You hope there is a way to get your artifact. See what Iocas is doing..."Return to Iocas
Main Quest:
"Iocas gave you a key to his home. There you should find his daughter with the artifact. The house of Iocas is near the portal in Windy Snowland."Iocas gives you Iocas's Key. Before you leave Fjordawik, talk to each person to receive a reward:
- Sloidan gives you a Medium Mouse
- Maatha just gives you some gameplay advice
- Denala gives you a Medium Stork
Now head to Iocas's House next to the Warp Portal in the Windy Snowland and use the key once you enter. Then find Ilowa and talk to her.
Main Quest:
"After a long challenge you finally got the next artifact! Ilowa has given you some interesting hints about the possible location of another artifact. Return to Tondraest in Orad to discuss the next steps!"Ilowa gives you the Ethereal Spike. You also unlock Shop Level 5 at this time so go shopping! Return to Tondraest in Orad after you are done.
Main Quest:
"Tondraest in Orad is happy that you are back and alive. Regarding the next artifact, Tondraest has found a trace in one of his old and dusty books that leads to an isle in the west. Melt will explain how to get to your next destination."Talk to Melt
Main Quest:
"Your next artifact should be in the Wide Steppe which is located south-east of Euran. There is small village of merchants in the east of the Wide Steppe. Behind that village is a pitfall to prevent monsters from entering that area. With a Ladder from Melt, you can safely cross this barrier. In the Wide Steppe, you are on your own. Try to find a way to enter the dungeons in this area."Melt gives you the Steppe ladder (lol, no pun intended). Find the village in the Dead Lake Desert just south of where the Campfire is and use the Ladder to cover the pitfall there. Enter the Wide Steppe and find monster NPC Rilrom and speak to him.
Note:
- On your way to the Wide Steppe, you may want to use the Ocher Stone Key you got in Castle Temwall and enter the gate to the Ocher Stone Swamp in the southwest section of Hopper Forest. Head south once your through the gate to find Jewom. Talking to him unlocks The Queen Bee side quest.
Note:
- Again, on your way to the Wide Steppe, if you go to the far northeast section of Hopper Forest, you will enter the Moss Stone Swamp. Just as you enter, the nearby NPC Darrak will start the Crystal Fields Side Quest. Note that this NPC also tells you that taking all the bags that drop during battles will give you more and sometimes better items then what you normally would get from the item box at the end of a battle.
Note:
- Just a short walk north of Rilrom's location, you can speak to Tenan to start the side quest: The Expelled Person
Main Quest:
"The Wide Steppe is taken over by monsters. You have encountered Rilrom, who is planning an intrigue against his own tribe. Rilrom has seen Namoris but you have to help him first before he will tell you how to catch your old rival who surely possesses the next artifact. Your first step is to become a member of the tribe. Talk to Drajight in the south-west of the Wide Steppe."Go to the southwest section of the Wide Steppe and speak to the monster NPC Drajight
Main Quest:
"Drajight in the south-west of the Wide Steppe doesn't like the idea of a human joining his tribe but after a long negotiation, he is willing to give you a chance. You have to pass a number of trials. Your first challenge is to beat Drajight in a battle."Fight Drajight. After you win, speak to him again.
Reward:
- Antidote Flask x 2
- Poison Resistance (Scroll)
Main Quest:
"After you have successfully beaten Drajight and passed your first trial, he has given you a second one, which he is sure you will fail miserably. Drajight wants eight badges from a rival tribe. You'll find their bags around the camp of Drajight and his fellows in the south-west of the Wide Steppe."Drajight tells you to find 8 Purple Monster Badges. These are located in bags behind the Sting Wasp mobs in the small wooden fenced off areas in and around Drajight's camp. When you have them all, return to Drajight.
Main Quest:
"Drajight is convinced that you have cheated in your last trial and is certain that you will fail in the next one. He sends you to Lowritz to receive your final task. Lowritz is located in the same camp as Drajight in the south-west of the Wide Steppe."Go speak to monster NPC Lowritz, who is just beside Drajight.
Main Quest:
"Lowritz is a buddy of Rilrom who wants to become the leader of the tribe. Travel to Rilrom in the east of the Wide Steppe."Now go back to Rilrom in the east.
Main Quest:
"Rilrom is pleased with the progress toward his leadership. Return to Lowritz with his axe. Lowritz will show you a way to enter Zrah's dungeon. The camp of Lowritz and the other monsters is in the south of Wide Steppe."Rilrom Gives you the Axe of the Tribes. Go back to Lowritz.
Main Quest:
"You have obtained the key from Lowritz to enter the dungeon of Zrah. This dungeon is located on a neighboring island close to the monster camp of Lowritz and Drajight. Take a raft and travel east to get there!"Lowritz gives you Lowritz's Key. Rent a raft from the nearby monster NPC Quarqz and head east to Vildwar Isle. Head into the Zrah's Camp dungeon and use the key Lowritz gave you to gain entrance. Work your way to the Northeast to find the Boss Zrah. You will give him the Axe of the Tribes and a battle with him ensues. After it is over, speak to him again.
Notable items found in Zrah's Camp:
- Fight Pattern 17 (use the fire stand warp in the boss room to gain access to the chest)
Main Quest:
"You have beaten Zrah in a demanding battle. He is willing to pass his leadership to Rilrom, who will be delighted to hear the good news. Return to Rilrom, you can find him in the east of the Wide Steppe."Return to Rilrom
Main Quest:
"Rilrom is happy to be the leader. He keeps his side of the bargain. You can enter a dungeon on a small isle near the Tiny Abyss Desert. There you should find Namoris. The Tiny Abyss Desert is east of the Wide Steppe."Rilrom gives you Rilrom's Key. Head east through the Tiny Abyss Desert to the coast and rent a raft from Quarqz. Then head east to the next island. Enter the Thousand Eyes dungeon and use the key Rilrom gave you to gain entrance. Navigate this perplexing dungeon and find Namoris. Note: This dungeon is littered with Dungeon Warps. Use this excellent Map to guide you. When you find Namoris, you will have your third battle with him. After the battle, speak to him.
Note: Clearing Level 4 of Stormlord's Den can add a fast four (4) levels. At Lv.42 Baldren gets his 5th sub-turn, which will help considerably in the fight against Namoris.
Notable items found in Thousand Eyes:
Blue Crystal
Fight Pattern 18
Rage Lid+
Rainbow Medal x2
Rill of Death+
Yellow Crystal
Main Quest:
"Namoris was polite as always but after a short 'conversation' he left the next artifact for you. Tondraest in Orad will be happy to hear something from you."Namoris hands over the Magic Socket. Now return to Tondraest in Orad.
Main Quest:
"The next part is on Green Heart Isle! Some families live there that could help you along to find the next artifact. You have to take a raft at the harbor of Orad to get there. Green Heart Isle is located at the coast south of Orad. If you have some spare time, you can travel to Tafar. You can win new prizes from the Wheel of Luck lottery."After speaking with Tondraest, Lottery is unlocked. Go to Tafar is like at this time. After you're done, rent a raft and go to Green Heart Isle. When you arrive, speak to Eranti
Main Quest:
"You have met Eranti. He is a decendant of one of the families who possess a key to the crypt where the artifact is located. These keys are mostly hidden near tombstones. For one key, you will have to defeat the Sting Spider. Search for the other keys on Green Heart Isle but also on the other isles in the north-west! The entrance to the crypt is on Green Heart Isle."Eranti says you need six colored keys to enter the crypt (Cave of the Ancestors). He gives you the Green Key. The others are located here:
- The Yellow Key (Defeat the Sting Spider boss)
- The Violet Key (near a tombstone in the southeast of Green Heart Isle)
- The Red Key (near a tombstone in the west of Green Heart Isle)
- The Blue Key (on the first isle west of Green Heart Isle)
- The Orange Key (on the second isle west of Green Heart Isle)
When you've found all the keys, go into the Cave of the Ancestors and use all the keys to enter. As soon as you enter, you'll run into an monster NPC named Qalan. Speak to him to start the side Quest:
- The Chameleon (Note since you are here, you can complete this Quest now if you want)
Find your way to the north east and fight the boss Xilib
Notable items found in Cave of the Ancestors:
Rainbow Medal x2
Fight Pattern 21
Yellow Crystal x2
Heavyfeather Mantle+
Klamm's Cuirass+
Main Quest:
"You have received the artifact from Xilib, a weird person. Return to Tondraest in Orad. Only one more artifact is missing. Find it and you can leave this world!"After you defeat Xilib, He hands over the Orb of Delusion. Now return to Tondraest in Orad.
Main Quest:
"Now you have collected six of seven artifacts. While you were hunting the artifacts, Tondraest has discovered the whereabouts of the last artifact. It should be on Cassar Island, the place where you started your journey! Search for Stella!"Go back to Cassar Island and talk to Stella
Main Quest:
"Stella has a little storage place in the Southport Mines, a dungeon in the south-east of Cassar Island. There should be an old Casket. Hopefully, inside this Casket is the last item you are searching for. Once you have found the Casket, return back to Stella. She will open it for you."Stella gives you the Storage Place Key. Go to the Southport Mines and enter. Take the first left as you enter and use the key Stella gave you to open the storage room and grab the Casket. Now return it to Stella.
Main Quest:
"After you brought Stella the Casket, she gave you the last artifact. How exciting, finally you have all seven pieces! Tondraest in Orad will try to put all seven artifacts together. Soon you will be home!"You receive the Crystal Clasp from Stella. Return to Tondraest.
Main Quest:
"Tondraest has figured out that these artifacts can be put together to create a new item. With this item, you can open the portal to travel to your world. But Tondraest has gotten a message from Teyvan. He needs your help. Travel through the portal to the Dead Lake Desert. Near the portal you will find Teyvan. In the meantime, Tondraest will be putting the artifacts together."Go through the portal to Dead Lake Desert and speak to Teyvan nearby.
Main Quest:
"Teyvan wants you to integrate Zelorus into your group. Zelorus is in a bad mood after he lost his artifact and needs new challenges. Or maybe it's the Cactus Cake? Who knows. You'll find Zelorus at a small isle at the west of Tafar. You have to take a raft to get there!"Go back to the Dead Sand Isle and speak with Zelorus
Main Quest:
"Zelorus is now part of the gang but you are not sure if this jester will integrate well into your group. On the other hand, one more weirdo... Tondraest should be ready with your staff. You are only a few moments away from leaving this weird place. Hurry, back to Orad!"Zelorus joins your party and becomes the final member. Get his scrolls at the Scroll Shop, and then head back to Tondraest in Orad.
Main Quest:
"Your journey isn't over yet. You have to travel to the other countries of Rainbow Moon. Ask Captain Ora at the harbor in Orad how to travel overseas."You receive the Patched Staff and Recipe Magical Glue from Tondraest who tells you you need all the ingredients on that list to fix the staff. You can view the needed items on that list by going into the menu and selecting it in the Key Items section. You also unlock Shop Level 6 at this time, so go shopping. After you are done, head over to Orad's harbor and speak to Captain Ora.
Main Quest:
"Tondraest has to make a glue to put the artifacts together. To mix the glue, he gave you a recipe with a list of ingredients. Rent a boat at the harbor of Orad and travel to Mordan, Arilla, and Tscha. Tondraest recommends you to start with Tscha. Your map of Rainbow Moon will help you with your journey. Once you have found all of the ingredients, return to Tondraest."Captain Ora gives you the Map of Rainbow Moon. You are shown a tutorial on the new aspects of the game including being able to travel anywhere by boat.
Note:
- The following main quest to get the ingredients for the Recipe Magical Glue will take a long time to complete. You will probably get your characters to the main story line level of level 80 in the process (achieved mostly by doing all of the side quests that are available at this time), which is what you will want to do when you face Namoris's 4th version. You can beat him at lower levels, but it's much easier at level 80. Anyways, lets start with Tscha as Tondraest recomends.
Grab a Boat and use this Map as a guide and head to the town of Taswan on Tscha.
Note:
- There are two important side quests that start in Taswan. They are important because they open Lottery Level 3 & 4 (and a new Shop Level). It is not necessarily important because of the armor and weapons you can win, but important because of the upgrade crystals that you can win (although having better equipment doesn't hurt). You will have to level up your characters to be able to finish these side Quests:
- The Sailor (this map will also help you... When completed, you gain a Lottery Level)
- The Great Labyrinth ( You gain a Lottery Level as well as a Shop Level by completing this side quest)
Note:
- There is also one other side quest you may want to attempt just after you receive the Recipe Magical Glue. I attempted it when my characters were level 42 ish and was able to pull it off on NORMAL mode (not sure if it would be possible at that level on HARD mode). The reason you may want to attempt it is because it raises your Shop Level even before you begin getting any items for the glue. It will be well worth the effort. You really only need to beat 5 level 56 Backsliders, and if your lucky, some will run away when their HP drops below 50%. It took me about 25 minutes and a fair amount of recovery items. It starts in Polad in Mordan with NPC Kri-Lo (next to the inn). It is called:
- Big Golden Statue
No biggy if you can't do it right away, but at least you know the option is there. And also remember that you gain a Shop Level just by completing The Great Labyrinth, so you are welcome to do that first since you have to do it anyways to advance post game play.
Note: The following Side Quests can all be started at this point (some of which involve the items you need for the Recipe Magical Glue):
- Big Golden Statue
- Robe Hunt
- The Great Labyrinth
- Flotsam and Jetsam
- The Two Friends
- The Sailor
- The Flower Woman
- The Anthology
- Lost in Darkness
- The Remedy (unlocked by completing Lost in Darkness)
- Protection for Felad
- Lava Hunt (unlocked by completing Protection for Felad)
- Forest Hunt
- The Crazy Old Man II (unlocked by completing The Crazy Old Man I)
- Insincere Friend I (you can start this quest but cannot finish it until after you have given all the items to Tondraest for the Recipe Magical Glue)
- The Cold Winter
- Ice Hunt
- Hard Liquor
- Lavender Tincture
- The Boyfriend
- Love and Hate I
- Love and Hate II (unlocked by completing Love and Hate I)
- Love and Hate III (unlocked by completing Love and Hate II)
- Moss Crystal
Note:
- One other thing before we get started, check out this Page. It basically tells you all the materials that offer Passive abilities that you can use to give you an edge. You can spend time to farm these items while you level up. You will still get 3 more Shop Levels increases before you have to face Namoris for the last time, so think about saving those items and the Black Cystals you can win at the Lottery for that (since they are rare to obtain). It is entirely up to you to use those items anytime you wish, if you don't mind farming for more for more of them before the final main story line fight.
The Recipe Magical Glue can be opened at any time in the key items menu. Here is the list of ingredients on that list:
- 1 x Yellow Ruby from the Item Shop
- 1 x Enchanted Sand from Tscha
- 1 x Singing Bowl from Tscha
- 8 x Sugar Tears from Arilla
- 1 x Mortar and Pestle from Arilla
- 1 x Emerald Scale Pow. (powder) from Arilla
- 10 Dirty Fingernails from Mordan
- 1 Pulsating Liquid from Mordan
- 6 Wellspring Splashes from Arilla and Mordan
YELLOW RUBY:
The Yellow Ruby can be bought at the Item shop
ENCHANTED SAND:
Go to Taswan in Tscha and speak to Iaomy. She will activate the Flotsam and Jetsam Side Quest. Refer to the following map for their locations:

Iaomy will reward you for each Flotsam and Jetsam you return to her. The rewards are as follows:
First one:
- 78 Rainbow Coins
Second one:
- 68 Rainbow Coins
Third one:
- 61 Rainbow Coins
Forth one:
- Enchanted Sand
Fifth one:
- Mighty Anti Flask
- 64 and 65 Rainbow Coins
Sixth one:
- Herbal Cake x 2
- Boost of Savvy
- 91 and 83 Rainbow Coins (and quest completion)
SINGING BOWL:
Speak to Fenore in Taswan on the Tscha continent. She activates The Great Labyrinth side quest. Go into the Great Labyrinth in east Taswan and navigate your way through the dungeon (NOTE: there are 2 ways to reach the boss... one way in the south you will see a signpost stating that a warp will take you straight to the boss, or the long path going from level 1 to level 2 continuously until you reach the north section of the dungeon). I would recommend doing the long path because it will also bring you to the item that Fenore requested.. The Old Comb (it is just past the 4 gates in the north section of level 1). The reason is that returning the comb to her unlocks a Lottery Level. Now continue on to fight the Terz boss. Speak to Terz after you defeat him and he gives you the Singing Bowl. Then return to Fenore. Completing this side quest unlocks a Shop Level even though there is no text to say otherwise.
SUGAR TEARS:
Make your way to the continent of Arilla and fight the Green Hornet Mobs scattered all over there to get this item (Sugar Tears are a 100% drop). You need 8 of them.
EMERALD SCALE POW. (powder):
First you need to go to Felad in Arilla and speak to Jalad who is next to the Savant there. He tells you to meet him at the Broad Kennel dungeon in southern Arilla. Go there now and you'll find him near the entrance. Speak to him and he gives you Jalad's Key (which opens the Broad Kennel dungeon). This conversation also unlocks The Anthology side quest. This quest is two-fold since he tells you to find him an old book (the Anthology) and he tells you that if you find 5 Emerald Scales, he can make Emerald Scales Powder from them.
Enter the dungeon and make your way through all of it in search of the needed items. Beat the Hyperdrone Boss (don't forget to grab the other key item in the chest behind him) at the end and return to Jalad. In return for the 5 Emerald Scales, he gives you the Emerald Scales Pow.
MORTAR AND PESTLE:
In searching for the previous Emerald Scales in the Broad Kennel, The Mortar and Pestle can be found in the chest behind the Hyperdrone boss in the east section of the dungeon.
DIRTY FINGERNAILS:
The Dirty Fingernails drop from the Marauder enemies that are scattered throughout the continent of Mordan (100% drop). You need 10 of them.
PULSATING LIQUID:
Go to Min-Fier in the east of Mordan and speak to him. The side quest Moss Crystal is unlocked. This quest is two-fold since he asks you for a Moss Crystal and also tells you that if you can find 4 Pulsating Slimes, he can turn them into Pulsating Liquid. He gives you Min-Fier's Key which gains you access to the Mining Shaft dungeon. Go to the Mining Shaft and enter (NOTE: if you haven't already done so, go south from the entrance and open the chest containing the Big Golden Statue which unlocks a Shop Level after you give it to Kri-lo in Polad as part of the corresponding Big Golden Statue side quest). Make your way through the 4 level dungeon and fight the Red Blob semi boss enemies to get the Pulsating Slimes. The Red Blobs are in the following locations:
- Central east section of the main floor
- Central section of Level 2
- East section of level 3
- Central south section of level 4
Note: The Moss Crystal can be found in the east section of level 4.
After you have the 4 Pulsating Slimes, return them to Min-Fier and he hands over the Pulsating Liquid.
WELLSPRING SPLASHES:
Refer to the following maps for the locations of the Wellspring Splashes:


You should now have all the needed items for the Recipe Magical Glue. Now return to Tondraest in Orad give him the items.
Main Quest:
"Tondraest has finally made the Magical Portal Staff to bring you back to your home world. He sends you back to Cassar Island to the portal where you first entered Rainbow Moon. Talk to Okimocery. And don't forget, the shops have new offers!"You hand over all the items for the Recipe Magical Glue as well as the Patched staff to Tondraest who transforms it into the Magical Portal Staff. He then tells you to go back to Cassar Island and talk to Okimocery near the portal there. You also receive your final main story Shop Level (level 9) upgrade.
Note:
- At this time, the Titan's Revenge item is available at the armor vendor, so If you want, you can continue with the Insincere Friend I side quest and finish it. When you do finish it, it unlocks the Insincere Friend II side quest which you can also finish.
Note:
- Speaking to Okimocery on Cassar Island will initiate the start of the last battle with Namoris and he will be standing right at the portal so you can't use it until the main story is over with, so you may want to consider a few things before you speak to Okimocery. The last battle with Namoris can be quite tough if you are not well prepared for it. You really don't have to go to all the trouble I did to get ready, but it still doesn't hurt to be somewhat prepared. Just to let you know, the final battle was quite easy for me because of what I did beforehand, which was:
- Leveled my 3 main characters to the maximum main story level of 80
- Bought all the best equipment I could get and upgraded the weapons and armors to the plus versions with Red and Black Crystals I either found or won at the Lottery.
- After I made them the Plus versions, I then began farming for materials (if I didn't already have them) that would give me a passive ability for every piece of equipment and allowing me to put my passive skill points elsewhere. My 3 main party members each had materials added to their equipment that gave them the Protected, Hasted, Item Master, Inflated, Sniper, Daze Resistance, Worsened Resist., and Poison Resistance. Refer to this Page that lists those materials.
- Recovery Item slots were at 100 (hardly used anything because of my maxed out stuff and passive abilities).
You really don't have to go as far as I did, but It really does help in post game play in getting to level 150.
There are a few things though that I would consider a must for the Namoris battle, and that is being Hasted and a good supply of Mighty Flasks and Anti Slowed Flasks or Mighty Anti Flasks since he casts slow on your party A LOT.
When you feel you're ready, head to Cassar Island and speak to Okimocery.
Main Quest:
"Okimocery has tried to open the portal. Unfortunately your old friend Namoris is back. It seems that first you will have to settle a little argument with Namoris before finally going back home."The fight with Namoris is in 3 stages. You do not fight HIM until the last stage. Speak with Namoris when your ready to start the first monster battle.
After the first battle speak to him and he rewards you with 1,938 Rainbow Coins. He will immediately want to start the next battle, so cancel it and go heal up in Cassar Village if needed then return for the second stage. Fight the second harder set of monsters. After you win, speak to him again and he rewards you with 2,134 Rainbow Coins. As before, he will immediately want to start the next battle, so again, cancel it and heal up if necessary and also save your game.
Now for the real battle. The main strategy you must do is surround Namoris with all 3 of your characters, hopefully in a position where all 3 of your characters can use active skill attacks against him. The reason you will want to do this is when Namoris gets below 50% hit points, he will summon 4 Servants (book enemies) and they will heal Namoris if he is not surrounded. The only other thing you really need to watch out for is if your characters get hit with SLOW. Other then that, just stay alive until he falls. (ps: since I have yet to play this game on hard mode, I'm not sure just how difficult this battle is on that mode).
Main Quest:
"Namoris has been defeated, hopefully for the last time. Go to Okimocery to return to your home. You can find Okimocery at the portal of Cassar Island."Congratulations on beating Namoris's final battle!!!
After you have beaten him, talk to him and you'll get a tutorial on what is to come in post game play. You can now level your characters to Level 150!
Speak to Okimocery to view the end game credits. Make sure you let them finish, and afterwards you will end up once again near the portal on Cassar Island to start post game play.
Post Game Quest:
"Although your main quest ends here, there's still a lot more to do and explore on Rainbow Moon. Can you solve the mystery surrounding the magic fields that block your passage in some of the dungeons that you have visited before? Also check your side quest log for further unsolved quests. From now on, you can play till the level cap of 150."Refer to the Post Game Guide to further your adventures in post game play!